npm-modules
axios
Axios 是一个基于 promise 网络请求库,作用于node.js 和浏览器中。 它是 isomorphic 的(即同一套代码可以运行在浏览器和node.js中)。在服务端它使用原生 node.js http 模块, 而在客户端 (浏览端) 则使用 XMLHttpRequests。
axios 是最著名的 Javascript 请求库之一。
- https://www.npmjs.com/package/axios
- https://github.com/axios/axios
阅读源码前应详细阅读 axios 官方文档, 以及 README.md 说明文件。
之前就看过一次源码, 当时感觉设计精良,其他的也没了, 前些日子需要做请求拦截重试功能, 同时又看了一遍 axios 的源码, 这才感觉 axios 的设计,兼容扩展十分强大.
参考好文
- 官方文档: https://axios-http.com/zh/docs/intro
- 推荐 You-Dont-Know-Axios
- 若川 学习 axios 源码整体架构,打造属于自己的请求库
- 77.9K Star 的 Axios 项目有哪些值得借鉴的地方\
设计理论

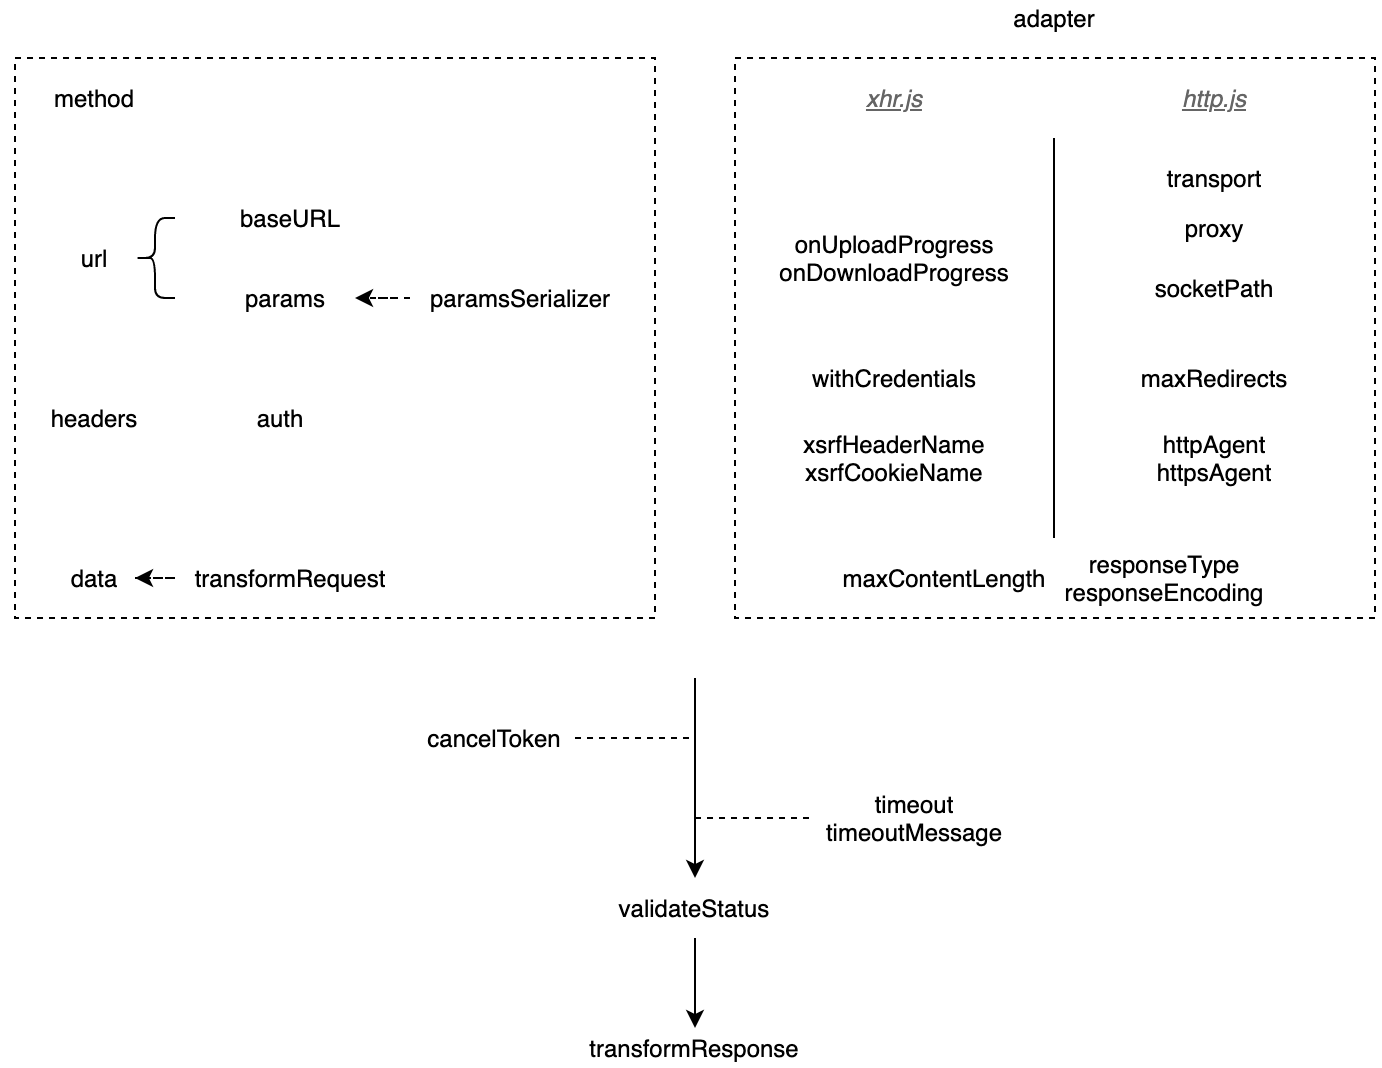
请求配置

关于请求配置参数,参见 axios 文档
// axios requestOptions
{
  url: '/user',
  method: 'get',
  baseURL: 'https://some-domain.com/api/',
  headers: {'X-Requested-With': 'XMLHttpRequest'}, // 应为 headers
  params: {
    ID: 12345
  },
  paramsSerializer: function (params) {
    return Qs.stringify(params, {arrayFormat: 'brackets'})
  },
  data: {
    firstName: 'Fred'
  },
  timeout: 1000, // 单位毫秒, 默认值是 `0` (永不超时)
  withCredentials: false, // 跨域使用凭证, 默认 false
  responseType: 'json', // 默认值
  xsrfCookieName: 'XSRF-TOKEN', // 默认值, xsrf token 的值,被用作 cookie 的名称
  xsrfHeaderName: 'X-XSRF-TOKEN', // 默认值, 带有 xsrf token 值的http 请求头名称
  validateStatus: function (status) {
    return status >= 200 && status < 300; // 默认值
  },
}
目标
- utils
- 使用及场景
- 源码分析
- Axios 生态
- 功能扩展
使用
const axios = require('axios');

// const instance = axios.create({
//   baseURL: conf.apiBaseUrl,
// });

// 向给定ID的用户发起请求
axios.get('/user',{
    params: {
      ID: 12345,
    }
  })
  .then(function (response) {
    // 处理成功情况
    console.log(response);
  })
  .catch(function (error) {
    // 处理错误情况
    console.log(error);
  })
  .then(function () {
    // 总是会执行
  });

// 支持async/await用法
async function getUser() {
  try {
    const response = await axios.get('/user?ID=12345');
    console.log(response);
  } catch (error) {
    console.error(error);
  }
}
源码分析
通读源码后,可以浏览下 axios 的 Issues 以及 PR,数量不少,甚至可以尝试解决。
项目文件内容比较多,涉及以下内容。
- Axios 分层架构
- 适配器设计:适配思想, 其增强思路还可实现如下功能
- 接口数据缓存
- 请求节流
- 请求失败重发机制
- 取消重复请求
- 拦截器设计
- axios 的拦截器的由注册->编排->执行三部分组成
- 任务管理、编排与执行
- 转换器设计, 数据校验与转换
- axios 做了大量的此类工作
- 响应结构设计
- 取消请求设计
- 数据安全 CSRF 防御
- 跨站请求伪造(Cross-site request forgery)
- 工具方法 helpers
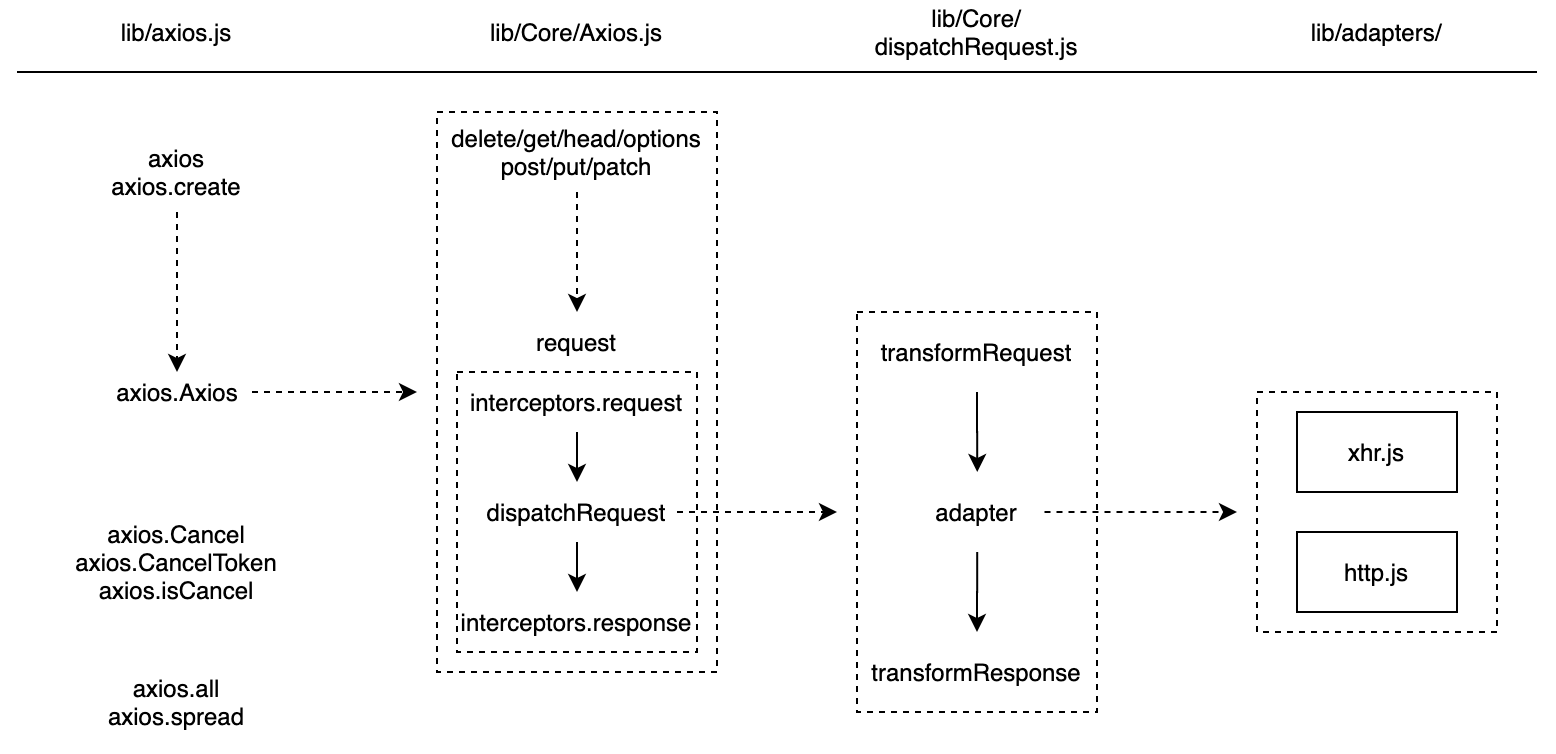
调用流程:初始化Axios——> 注册拦截器 ——> 请求拦截——> 发起请求 ——> 响应拦截 ——> 请求响应回调
NOTE: 画一张图,讲明白整个 Axios 的源码设计
初始化
axios 入口
axios 是函数,也是对象 作为函数时,调用的是
Axios.prototype.request
/**
 * Create an instance of Axios
 *
 * @param {Object} defaultConfig The default config for the instance
 * @return {Axios} A new instance of Axios
 */
function createInstance(defaultConfig) {
  var context = new Axios(defaultConfig);

  var instance = bind(Axios.prototype.request, context); // axios 是函数

  // Copy axios.prototype to instance
  // Copy get post put delete head options patch
  utils.extend(instance, Axios.prototype, context); // 也是对象

  // Copy context to instance
  // Copy Axios.defaults, Axios.interceptors
  utils.extend(instance, context);

  // Factory for creating new instances
  // 工厂模式 创建新的实例, 相比 axios 多了自定义配置
  instance.create = function create(instanceConfig) {
    return createInstance(mergeConfig(defaultConfig, instanceConfig));
  };

  return instance;
}

// Create the default instance to be exported
var axios = createInstance(defaults);

// Expose Axios class to allow class inheritance
axios.Axios = Axios;

module.exports = axios;
module.exports.default = axios;
关于 Axios
function Axios(instanceConfig) {
  this.defaults = instanceConfig;
  this.interceptors = {
    request: new InterceptorManager(),
    response: new InterceptorManager()
  };
}

// 其他方法都挂载在 prototype 上
// function request(configOrUrl, config) {}
Axios.prototype.request
// request 是最核心的方法,包含
// - mergeConfig
// - requestInterceptorChain
//   - interceptors.request 请求拦截器
//   - dispatchRequest -> adapter
//   - interceptors.response 响应拦截器


// function getUri(config) { return buildURL() }
Axios.prototype.getUri

// function(url, config) {
Axios.prototype
['delete', 'get', 'head', 'options']

// function(url, data, config) {}
Axios.prototype
['post', 'put', 'patch']
适配器设计
如何实现一个适配器,可以参看 axios/adapters/README.md
具体实现参见官方的两个适配器 xhr.js 和 http.js
var settle = require('axios/lib/core/settle');

module.exports = function myAdapter(config) {
  // At this point:
  //  - config has been merged with defaults
  //  - request transformers have already run
  //  - request interceptors have already run

  // Make the request using config provided
  // Upon response settle the Promise

  return new Promise(function(resolve, reject) {

    // example
    // var requestData
    // var request = new XMLHttpRequest();

    var response = {
      data: responseData,
      status: request.status,
      statusText: request.statusText,
      headers: responseHeaders,
      config: config,
      request: request
    };

    settle(resolve, reject, response);

    // From here:
    //  - response transformers will run
    //  - response interceptors will run
  });
}
通过此设计,还可以实现
- 小程序的请求适配器
- taro-adapter
- uniapp-adapter
- fetchAPI 的请求适配器
拦截器设计
参考设计理论, 对比以下示例,非常容易理解拦截器的大体设计
axios.interceptors.request.use(requestResolve1, requestReject1);
axios.interceptors.request.use(requestResolve2, requestReject2);
axios.interceptors.response.use(responseResolve1, responseReject1);
axios.interceptors.response.use(responseResolve2, responseReject2);

// 拦截器不要返回数据,依然返回 AxiosResponse 对象

axios(config).then(thenBlock).catch(catchBlock);

// equals to

Promise.resolve(config)
  .then(requestResolve2, requestReject2)
  .then(requestResolve1, requestReject1)
  .then(dispatchRequest, undefined)
  .then(responseResolve1, responseReject1)
  .then(responseResolve2, responseReject2)
  .then(thenBlock).catch(catchBlock);
注意:
The real request is not sent immediately when you call axios(config), because dispatchRequest is one of then handlers. Avoid doing synchronous time-consumed tasks after axios calls.
// 有点类似如下的写法
axios(config);

setTimeout(function () {
  // do time-consumed tasks in next event loop
});

// 所以,避免在 axios 调用后做同步耗时的任务
浏览器在重定向时总是会添加 Authorization 标头,参见axios/axios#2855 (comment)
那么拦截器怎么实现的呢
核心代码逻辑在这里 https://github.com/axios/axios/blob/master/lib/core/Axios.js#L95~L117
转换器设计
从架构设计上清晰的看到转换器是适配器前后最近的数据处理层
- config.transformRequest
- config.transformResponse
默认设置在 defaults.js 中,具体参见 https://github.com/axios/axios/blob/master/lib/defaults.js#L54
响应结构设计
一个请求的响应包含以下信息。
{
  // `data` 由服务器提供的响应
  data: {},

  // `status` 来自服务器响应的 HTTP 状态码
  status: 200,

  // `statusText` 来自服务器响应的 HTTP 状态信息
  statusText: 'OK',

  // `headers` 是服务器响应头
  // 所有的 header 名称都是小写,而且可以使用方括号语法访问
  // 例如: `response.headers['content-type']`
  headers: {},

  // `config` 是 `axios` 请求的配置信息
  config: {},

  // `request` 是生成此响应的请求
  // 在node.js中它是最后一个ClientRequest实例 (in redirects),
  // 在浏览器中则是 XMLHttpRequest 实例
  request: {}
}
这样设计,内容丰富,适配性很强,包含
- http 状态数据
- header 内容
- 请求体内容
- 以及响应数据
很多人封装接口响应的数据,仅保留了响应数据,其他数据给丢掉,认为提供了最简模式,但事实上在有特定的诉求时,就无法适配,比如
- 出现了特定的数据格式,需要特定处理
- 请求失败想重试,结果没有请求体相关配置内容
- 特定结果需特殊处理,没有 http 状态数据可用
这里就需要注意:
拦截器不要返回数据,依然返回这个 AxiosResponse 对象
如果是错误的情况呢,返回的是 AxiosError 对象,大体结构如下
// AxiosError
{
  name: 'AxiosError',
  message?: string,
  code?: string,
  config?: AxiosRequestConfig<D>,
  request?: any,
  response?: AxiosResponse<T, D>
  isAxiosError: boolean;
  status?: string;
  toJSON: () => object;
}
取消请求设计
从 v0.22.0 开始,Axios 支持以 fetch API 方式 —— AbortController 取消请求
const controller = new AbortController();

axios.get('/foo/bar', {
  signal: controller.signal
}).then(function(response) {
  // ...
});
// 取消请求
controller.abort()
注意: 可以使用同一个 cancel token 或 signal 取消多个请求。
CancelToken deprecated
您还可以使用 cancel token 取消一个请求。
Axios 的 cancel token API 是基于可取消 Promise 提案(cancelable promises proposal)来实现的(该提案已被撤销) 。 此 cancel token API 从
v0.22.0开始已被弃用,不应在新项目中使用。
可以使用 CancelToken.source 工厂方法创建一个 cancel token ,如下所示:
// 在过渡期间,您可以使用这两种取消 API,即使是针对同一个请求:
const controller = new AbortController();

const CancelToken = axios.CancelToken;
const source = CancelToken.source();

axios.get('/user/12345', {
  cancelToken: source.token,
  signal: controller.signal
}).catch(function (thrown) {
  if (axios.isCancel(thrown)) {
    console.log('Request canceled', thrown.message);
  } else {
    // 处理错误
  }
});

axios.post('/user/12345', {
  name: 'new name'
}, {
  cancelToken: source.token
})

// 取消请求 (message 参数是可选的)
source.cancel('Operation canceled by the user.');
// 或
controller.abort(); // 不支持 message 参数
关于 cancelable promises 提案已撤销
axios 的核心逻辑实现在这里 https://github.com/axios/axios/blob/master/lib/core/dispatchRequest.js#L12
var outerCancelFn;

config.cancelToken = new CancelToken(function executor(cancelFn) {
  // 1. A Promise will be created in the constructor,
  // and its `resolve` callback is saved temporarily

  // 2. Wrap a callback `cancelFn` based on `resolve`,
  // as the parameter of `executor`, and call `executor` immediately

  /**
   * In fact, `cancelFn` looks like,
   *
   * function cancelFn(message) {
   *   // 1. create an instance of Cancel and save it as a member of CancelToken instance
   *   // 2. invoke `resolve` with the saved Cancel instance
   * }
   */

  // Save `cancelFn` in an outer value and call it with error message at any desirable time
  // Why can it cancel the request?
  // 1. `dispatchRequest` will check the member field of CancelToken, and throw it if found
  // 2. adapters will wait the Promise to be resolved, and throw the resolved value
  outerCancelFn = cancelFn;
})
分析:
- https://juejin.cn/post/7029729114378469383
- https://juejin.cn/post/7044532592640524324
- https://juejin.cn/post/6844903910650413070
- 修复内存泄露: https://github.com/axios/axios/pull/3305
- https://github.com/axios/axios/issues/1181
- 为了避免这种情况,每个请求都必须取消令牌,然后分配一个新令牌。
核心代码
var resolvePromise;

this.promise = new Promise(function promiseExecutor(resolve) {
  resolvePromise = resolve;
});

var token = this;

// eslint-disable-next-line func-names
this.promise.then(function(cancel) {
  if (!token._listeners) return;

  var i = token._listeners.length;

  while (i-- > 0) {
    token._listeners[i](cancel);
  }
  token._listeners = null;
});

// https://github.com/axios/axios/blob/main/lib/cancel/CancelToken.js#L37~L50
// L37~L50 是不必要的,保留是为了向前兼容,解释:
//    https://github.com/axios/axios/pull/3305/files#r947912940
// 问题: 是先运行上面的 then 方法,还是先运行下面的 then 赋值?
// eslint-disable-next-line func-names
this.promise.then = function(onfulfilled) {
  var _resolve;
  // eslint-disable-next-line func-names
  var promise = new Promise(function(resolve) {
    token.subscribe(resolve);
    _resolve = resolve;
  }).then(onfulfilled);

  promise.cancel = function reject() {
    token.unsubscribe(_resolve);
  };

  return promise;
};
验证 demo
数据安全 CSRF 防御
Axios 内部是使用 双重 Cookie 防御 的方案来防御 CSRF 攻击,利用CSRF攻击不能获取到用户Cookie的特点。
  xsrfCookieName: 'XSRF-TOKEN',
  xsrfHeaderName: 'X-XSRF-TOKEN',
详细参见 https://github.com/axios/axios/blob/master/lib/adapters/xhr.js#L145
工具方法 helpers
- 处理浏览器的 polyfill
- 管理 cookie
- 解析 HTTP 头
Axios 生态
数据来源 https://github.com/axios/axios/blob/master/ECOSYSTEM.md
- 通用
- axios-methoe-override
- axios-cache-plugin
- axios-fetch
- axios-jsonp
jsonpAdapter
- axios-retry
axiosRetry(client, { retries: 3 })
- axios-extensions
- axios-auth-refresh
- axios-jwt
- 记录和调试
- axios-response-logger
- axios-debug-log
- axios-curlirize
- 单元测试
- axiosist
- axios-mock-adapter
- mocha-axios
- React 和 Redux
- axios-hooks
- react-hooks-axios
- redux-axios-middleware
- 其他
- ky 基于 Fetch API, 支持现代浏览器和Deno
- Node.js,请查看 Got
- 同构需求,请查看 ky-universal
- node-libcurl
- superagent
- KoAJAX
- ky 基于 Fetch API, 支持现代浏览器和Deno
这里有几个,还是非常实用的
知识点
- Should
methodbe lower cases or upper?- 都应大写,参看HTTP specifications
- headers: CORS, cookies
data&&Content Typedatamust match with the header Content Typetext/plain-> data 是文本application/json-> data 应是 JSON 格式(使用JSON.stringify转换)application/x-www-form-urlencoded-> data 应是 URL/URI 编码的, 可以使用qs.stringify(data)转换
responseType- text
- json
- arraybuffer
- document
- blob
- stream
- axios 目前还不支持 Fetch API
- 跟随重定向 follow-redirects
- validateStatus
- 304 响应 sindresorhus/got
- 应用传输安全 (ATS)
扩展工具箱
扩展 axios 能力
- axios-tools
- axios-taro-adapter
- axios-uniapp-adapter
- axios-retry-enhancer
- axios-throttle-enhancer
- axios-cache-enhancer
Promise 链式写法
使用 Promise 链式写法的一个缺点是我们无法访问每个回调函数的作用域(或者其中未返回的的变量),你可以阅读 Alex Rauschmayer 博士这篇 a great article 来解决这个问题。
参考:
- 代码沙盒,能运行多种语言,且可以添加依赖
- Axios部分源码解析–拦截器
- 不要再被误导了,封装 Axios 只看这一篇文章就行了
- 拦截器不要返回数据,依然返回 AxiosResponse 对象
- 前端安全系列(二):如何防止CSRF攻击?